Smoking due to worn valve seals? – Replace without removing Engine
I needed to change the valve seals on my 75 XS650B, and was about to start removing the engine and dismantling the head, the normal procedure to change these seals. Then a friend pointed out to me the following article by "Grepper" on the "XS650 garage USA" website. This brilliant procedure allows one, by making a simple special tool, to change the valve seals through the valve adjustment access ports, without any engine disassembly whatsoever. A friend and I tried it, it works, although I found I had to make some modifications to the procedure to make it work for me. Mainly, I could not master the described method of seal removal and replacement, and I describe a different method.
Grepper’s article can be found at Change Valve Seals W/O Engine Disassembly Below are step by step instructions. Note the pictures on Grepper’s article show a later bike, earlier bikes such as my 1975 have a little triangular projection on the rocker arm, which make the procedure a little trickier and require the special valve spring compressor tool to have some specific and exact dimensions. I give these dimensions below.
While not complicated, this procedure does require a reasonable level of dexterity, and some intuition in understanding how to wriggle things into place and where to lever to help this "going into place" happen. It also requires care as you will be working with wrenches and tools very close to the machined surfaces of the seat for the tappet adjustment access covers, and you need to be careful not to work too roughly and mar these surfaces and edges.
Diagnosis of problem.
If your bike smokes heavily from any or both cylinders after start up, even to the point that a plug will foul and stop firing, oil is getting into the cylinder. If a compression test shows acceptable compression, say with lowest at 130 psi or better, and within 10 psi of each other, then you know it’s not the rings and bore, and the valve stem seals are the likely culprit. This is even more likely if it stops smoking after about 10 minutes of running. If the compression is markedly lower, say 115 psi, and jumps up markedly when you put a tablespoon of oil in through the spark plug holes, then your rings are the problem and it’s engine rebuild time. A bike that has been standing many years is more likely to have the problem, as the seals may have hardened and become ineffective.
Procedure.
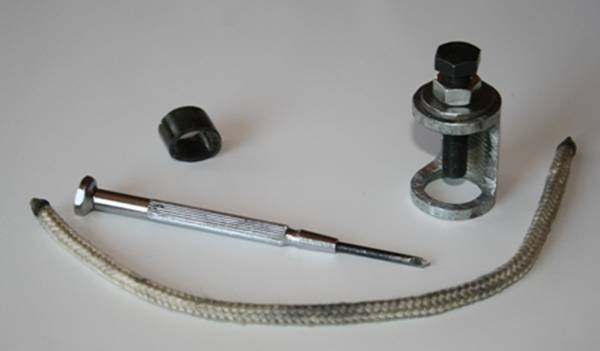
(1) - Make the simple special tools required. There are four required, shown in the picture
Valve spring compressor tool (vsct). Take a ½" npt metal pipe coupling. Grind both ends off equally to have flat surfaces, and till the coupling has an overall length of 36mm. Then grind away the center until the web left has a width of 23 mm, a depth of 7.5 mm, and the remaining rings top and bottom are 4mm thick. The compressor also requires an 8 mm x 1.0 bolt, 40 mm long, a nut for this bolt, and a washer 3/8" ID and 7/8" OD.
Piece of braided rope 3/16" or ¼" dia x10" long, to poke into oil drain holes to prevent dropped collets falling down holes.
Pick tool, made out of tiny screwdriver for example, to remove old seals.
Piece of vinyl tubing, 1/2" ID, 5/8" OD, 1/16" wall thickness. Must be vinyl, not polyethelene, which is too rigid to maneuver into place. For safely providing all-round even pressure when seating new seal over valve stem, and seating it onto valve guide.
Special tools required
(2) - Place bike on centerstand, remove gas tank, remove spark plugs, remove covers from all four valve adjustment access ports, remove alternator cover on left side of engine. This is held on by two screws, and is just behind the gear lever. Disconnect throttle cable/s at carburetors and tuck them out of the way
(3) – Put bike in neutral, and by means of wrench on the nut in the center of the alternator, rotate crankshaft in anticlockwise direction till the timing marks line up at Top Dead Center.
(4) – Check which cylinder is in firing mode, and do the valves on this one first. The cylinder in firing mode will have slight play on both rocker valve tappets. The one on exhaust mode will have the front (exhaust) valve fully depressed.
Following steps (5) through (32) describe how to do one valve. Simply repeat for the other four. Start with the front valve, the exhaust valve.
(5)- Just inboard of the base of the valve spring is a oil return hole. Push a few inches of the rope into this hole to block it from allowing dropped collets and anything else to go down this hole, and let the rope hang down the engine.
(6)- Remove the tappet from the rocker arm.
(7) – Give the retaining washer on the top of the valve springs a rap on its edge with a small hammer. This will free the collets which you are now going to remove as shown below.
(8)- Slide one end of the valve spring compressor tool (called vsct hereinafter) body between the rocker arm and the retaining washer on top of the valve spring. Rotate the tool so that the web is on the other side of the rocker arm to you. On the earlier bikes with the projection on the front of the rocker arm you will have to wiggle it around as you slide it in, when in properly one side of the web will touch the rocker arm behind the tappet hole, and the other side of the web will touch the projection on the front of the rocker arm, and the tool will be centered over the valve stem.
(9) - Run the nut on the 8mm bolt all the way up to the head of the bolt. Place the washer on top of the vsct, and pass the bolt down through this and thread it into the tappet hole on the rocker arm. Make sure you do this by finger and not by wrench to make sure you do not damage the thread on the tappet hole. If it will not thread easily, take a large screwdriver, pass it over the rocker arm behind the vcst, and place the tip against the inside far inside wall of the valve spring chamber , and gently lever down the rocker arm; this will allow the bolt to easily align with the threaded tappet hole and you will be able to thread in the bolt. Thread the bolt down into the rocker arm for the entire length of the thread in the rocker arm, but no more. Make sure you thread it all the way in order not to risk stripping it out and damaging the threads. Once threaded, release the leverage of the screwdriver
(10) - Run the nut down the bolt to the washer, and then keep turning it down with a wrench. This will compress the springs. I say springs because each valve on an XS650 has two springs, an inner and an outer. Compress the springs all the way until the nut will resist turning.
(11) – Place a long thin screwdriver through the spark plug hole, and lift the valve, which will have fallen down to rest on the piston top.
(12) – When the valve is lifted the collets will lift free of the retaining washer and may even fall to the side, but within the base ring of the vsct. Either way they will be easy to dislodge and remove. Dislodge and/or push them into position to remove using the pick tool if necessary, then remove them with needle nose pliers, or even better, with a retrieving magnet.
(13) – Release the tension on the spring by backing off the nut on the vsct, then remove the bolt from the vsct, and finally remove the vsct.
(14) – Remove the retaining washer from the top of the springs. This is tricky, because the spring is no longer held partially compressed by the valve, and will come right up to the rocker arm. You must force a screwdriver between the top of the spring, and lever down to get the tip of the screw driver under the center of the washer. The trick is to get the screw driver over the top of both the outer and the inner springs before you slide it under the washer. If you pass it under the top coil of the inner spring, easy to do, you can’t lever the washer out. But with the screw driver over the tops of both springs, the washer will lever out, especially if helped with another screwdriver from the top. Don’t worry about getting it back in, it goes in easily.
(15) – Reinstall the vcst and compress the springs as in (8), (9) and (10) above, but this time without the retaining washer.
(16) You will be able to see the top of the valve stem and the valve stem seal. Lower the piston slowly and gently by rotating the alternator nut clockwise by very small amounts, a few degrees at a time, after each movement push down on the valve with a screwdriver. When the valve stem goes just below the seal, and the top of the metal valve guide becomes visible inside the seal, STOP. Be very careful not to turn the engine any further at this point or you can drop the valve into the cylinder. And then you WILL have to remove the engine.
(17) – Using the pick tool, drive it through the rubber seal just inside the small tension spring, and just outside of the metal OD of the valve guide.
(18)- At this point the tension spring around the seal lips will probably pop off onto the shaft of the pick tool. Carefully lift it out being careful not to drop it. Use the needle nose pliers if nervous to lift it out with the pick tool. Discard it
(19) – Reinsert the pick tool through the rubber part of the seal, push it just past the OD of the valve guide and under the metal shoulder of the metal case of the seal body. Pop the seal body up with the pick tool, and lift it up and out of the pocket between the valve springs. Discard it.
(20) – Rotate the alternator nut anti-clockwise to bring the piston to TDC again. Do not go past, and if you do slightly, come back. Remember, it you rotate the engine around at this point you will drop a valve into the cylinder. Bringing the piston to TDC will push the valve up and the stem will come out of the valve guide, but not all the way as the valve head will be resting on the cylinder. Leave it there for now.
(21) - Grease the new seal very lightly with a moly assembly lube, both on the bottom where it seats over the guide, and where it passes over the valve stem.
(22) – Place the seal in side the springs and lower it so it is below the level of the top of the spring, but do not press on it. Work the piece of vinyl tubing between the rocker arm and the spring and onto the seal, where it will rest on the metal shoulders of the new seal. While using either your fingers or a flat knife blade to press down squarely down on the top of the vinyl tube, lift the valve up slowly but firmly with a screw driver passed through the sparkplug hole. The valve stem will pop up through the seal, although if you have a black vinyl tube you will probably not be able to see this happen. Continue to push down on the vinyl to make sure the seal seats fully over the valve guide.
(23) – Remove the vinyl tube piece. Looking at the valve stem, move the valve up and down with the screw driver through the spark plug hole. If the seal is properly seated on the guide, it will not come up with the valve stem. It almost definitely will be seated properly, but if it does come up with the valve stem, put back the vinyl and push it down again harder and deeper.
(24) - Release the tension on the spring by backing off the nut on the vsct, then remove the bolt from the vsct, and finally remove the vsct.
(25) - Slip the retaining washer back over the springs. It goes back a lot easier than it came out.
(26) - Reinstall the vcst and compress the springs as in (8), (9) and (10) above. It will be a little harder to insert and position the vsct this time because the unrestrained springs now have the retaining washer pushed right against the rocker arm, and you will have to do some levering with a screwdriver to shoehorn it in and turn it around the rocker arm, but you’ll get the knack. By the fourth valve anyway.
(27) – Place a long thin screwdriver through the spark plug hole, and lift the valve, which will be resting on the piston top.
(28) – The valve stem will come up through the retaining washer. Lift it enough to allow the collets to be slipped into place. Use a needle nose pliers to do this. This may be a little tricky. You may have to move the valve up and down with the screwdriver through the spark plug hole to get the collets to fall into place, while jockeying the collets into position with the pick tool, and holding the minimag flashlight in your mouth. But why do you think God gave you two hands and a mouth, anyway? A strong word of advice; do not use a magnetic retaining dish or a magnetic wristband small parts retainer to hold the collets safely while they are out of the engine. This will magnetize the collets, and on trying to reinsert them they will fight you tooth and nail from dropping into place, they will cling to the valve stem; the retaining washer, and of course the screwdriver’s and pliers’ tips. They will also either attract or repel each other. Ask me how I know.
(29)- With the collets in place, push the valve stem down with a screwdriver to initially seat and position them.
(30) - Release the tension on the spring by backing off the nut on the vsct, while watching the collets stay seated properly, then remove the bolt from the vsct, and finally remove the vsct.
(31) – Re-install the tappet loosely, but do not adjust.
(32) – Remove the rope.
(33) – Repeat steps (5) through (32) with the rear valve same side; the inlet valve.
(34) – Rotate motor through two full turns by turning the alternator nut anticlockwise, to bring this cylinder to TDC again, but with the timing chain properly tensioned for valve backlash setting. Set valves, I set exhaust to 0.006", inlet to 0.0025" on all models, the specs for the latest bikes, but check book if you want to follow factory recommendations for specific years. Note to ensure proper setting, lift rocker arm with your finger while passing feeler gauge. Us the go/no-go method, the correct feeler must pass and one measurement higher must not.
(35)- Rotate motor through one full revolution to bring other side to TDC.
(36) - Repeat steps (5) through (34) on this side.
(37) – Re-install the items removed in (2) above.
Farrell.